Monday, August 19, 2019

Photograph Your Art Like a Professional


N FOCUS

How to Photograph Your Art Like a Professional
How to Photograph Your Art Like a Professional
Image via amazonaws.com
Artists, let’s face it: your artwork is more likely to be seen in photographs than in real life. The internet allows us to share images of work to massive audiences online—audiences that might not have the chance to see your work in person, whether it’s in a major gallery exhibition or inside your studio. So, how you photograph your work really, reallymatters. If you’re trying to woo onlookers (and potential collectors, curators, jurors, panelists, etc.), then snapping quick pics with you iPhone likely isn’t going to cut it. But professional photographers can cost hundreds of dollars to hire—not an option for all, or probably most, artists.
If you’re taking the DIY approach to documenting your art, you’re best off procuring a digital single-lens reflex (DSLR) camera if you can. If you’re a student, you should be able to rent one out from the a/v department at your school. If you’re not, ask around to see if any of your friends have one you can borrow. Otherwise, local equipment rental companies typically offer daily rentals.
Once you’ve got your DSLR, follow the guidelines we outline below. Though you’d likely need years behind the lens to master digital photography, there are some quick tips—specifically tailored to document art—that will greatly increase your chances getting that perfect shot. 

Outside vs Inside
Cloudy, overcast days provide the most ideal light for photographing a single art work. Clouds basically act like diffusers for sunlight, meaning your work won’t reflect any harsh light, or accept any pesky shadows. We recommend buying a sheet of drywall at your local hardware store and using that as your background—whether you're shooting a sculpture resting on its surface, or hanging a wall piece.
But shooting outside isn’t always an option. Weather is the most obvious issue to worry about, but you might also need to consider how many artworks you’re hoping to document. If you have eight, then each piece will be slightly differently lit, since you’ll likely be shooting the last piece minutes or even hours after you’ve shot the first one.
So, while photographing outdoors may be recommended by most professional photographers, it’s likely not practiced often by many of them. Read on for tips on how to light your work indoors.

Indoor Lighting 101
The first thing you need to do is make sure your work isn’t under multiple light sources—whether natural or artificial. No matter what type of bulbs you’re using to light your work, it’s imperative that every single light source (if there are more than one) have the exact same temperature, which is measured in Degrees Kelvin and ranges from Soft White (2700K – 3000K), Bright White/Cool White (3500K – 4100K), and Daylight (5000K – 6500K).
In laymen's terms, all you really need to know is that each bulb you use should be the same temperature. To make sure that natural light isn’t seeping into your frame from a nearby window or skylight, make sure to either shoot at night after the sun has completely set or cover your windows with opaque black-out material.
There are a seemingly infinite number of ways that you can light an artwork, but we’ll describe a couple, starting with the easiest: just use whatever overhead lighting you have in your studio. Rather than thinking about how to bring light over to your work, bring your work over to the best-lit wall. When documenting multiple wall works, photographers will often set up their camera and their lighting just once—and then use the same nail (or screw, etc) to hang each artwork, one after another. In other words, keep the camera in a static position, and all hang your pieces in the same place. This way, you know the lighting will be the same on every single one, and you won’t waste time setting up your camera for each artwork you’re shooting. 
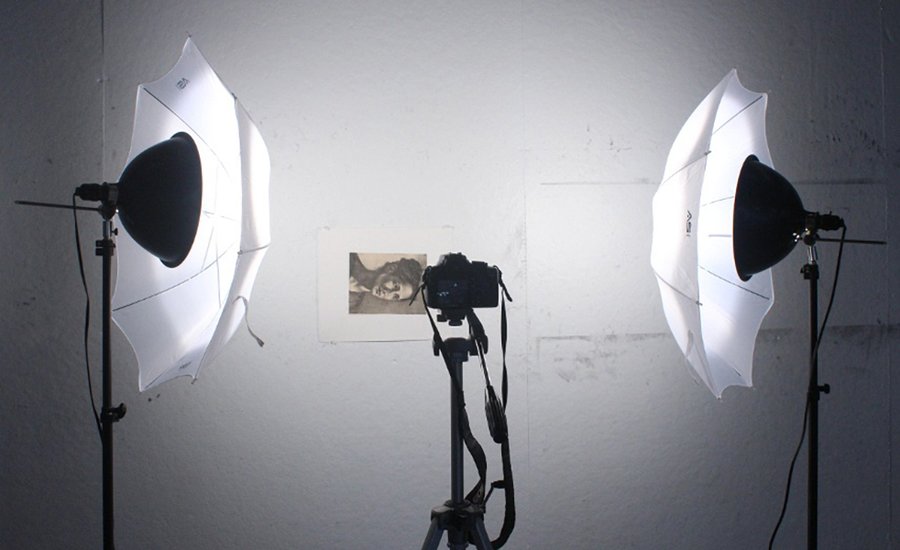
Another way to shoot your work is to place two lights (each with the same type of bulb—a “cool” household 100-watt bulb will suffice) on either side of your camera, facing the work at 45-degree angles. Rather than shining the light directly on the piece, diffuse the light to make it softer and more evenly lit. They make diffusers and umbrellas specifically for photography, but you can also just cover your light with a translucent plastic bag. (Just make sure it doesn’t melt or catch on fire!) If you’re photographing a flat surface, make sure that each bulb is the same wattage, and that they’re both equidistant from the wall. But if you’re shooting an artwork with texture, make the light source on one side a bit stronger—either by moving the light closer to the wall, or by using a higher-wattage bulb. This way, a slight shadow will be cast on one side, allowing textural detail to stand out. Oh, and remember to turn the flash off on your camera!

Adjusting White Balance
Most cameras will, by default, adjust white balance settings automatically. White balance settings control the “temperature” of your image. Ideally, you want a neutral temperature in which white parts of the image (like a white background) are actually white—not yellow or blue. When you’re camera is set to adjust white balance automatically, the settings will change depending on where you’re pointing your lens. If you’re shooting multiple works in different areas of the room, leaving your camera on auto-white balance will probably result in each image having a slightly different hue. So, it’s best to manually set your camera to stay on one particular white balance setting.
Often cameras will have preset settings like “cloudy,” “sunny,” “fluorescent,” “tungsten,” etc. Just pick whichever setting accurately describes the light source you’re using. On that setting, your images should look as neutral as possible. If they aren’t perfect, you can at least adjust them in a photo-editing software afterwords—which will be a heck of a lot easier if they’re all shot using identical white balance settings.

Tripod Tricks
Use a tripod. Don’t have one? Set your camera on a table or a stack of books—anything that gives your camera stability. But here’s another, less obvious trick: No matter what, put your camera on timer mode when you’re ready to take the shot. Even the slightest jostle from your finger touching the shutter release button could cause vibrations—and thus blurry photos. Most cameras have the option for a 10-second shutter delay (typically used to allow for “selfies”). Use it.
Secondly, make sure that the camera is positioned directly in the center of the work, and not titled or pointed up or down or side to side. You want to the lens to be perfectly parallel with the wall you are shooting, or the perspective will make your rectangle look more like a trapezoid. 

Resolution
You’ll want to take your photographs in the highest resolution possible, for the clearest image. To do this, make sure the camera you’re using isn’t set to a mode that sacrifices image quality or size. If there is a “fine” option for image quality, pick that. And, don’t waste pixels by shooting from too far away from your piece. Fill the viewfinder with the piece, with a little wall space around the edges, so that the piece itself is made up of as many pixels as possible—and thus able to show the most detail. Once you have your files on your computer, you can save them at different sizes or resolutions so that they’re easier to email or upload. But always keep your original file with the highest resolution as the master file.

A Trick for Reflective Art
Ideally, the work you’re shooting isn’t behind glass. (Document it before you frame it!) But if it is, then you’re undoubtedly going to be fighting glare. Here’s a trick: grab a black or dark-colored sheet and hang it right in front of the camera. Cut a small hole to allow the lens to poke through. VoilĂ ! No glare!

Exposure Blending
The human eye sees a much richer world, with bright lights and rich darks, than a camera lens sees. So, if you’re shooting something that has a huge contrast in values, you might have trouble capturing both in the same image. This problem might be most pronounced when say, you’re trying to document an exhibition with a video piece in it. The screen is so bright that your image either ends up looking like it’s really, really dark in the room but the video is visible, or the room looks normal but the video image is completely white. There’s a solution to this problem. But it’s not exactly uncomplicated.
Here are the basics: If you take multiple photographs with slightly different exposure settings, you’ll be able to blend them all together later on using editing software, in order to keep the best parts of each image. (Just remember not to move the camera in between shots!) There are many, many ways to blend the images together, so instead of going through each one, check out this very thorough guide.
Artspace Logo
RELATED ARTICLES:

Replication Vs. Restoration | When Old Technologies Become Obsolete


IN FOCUS

Replication Vs. Restoration: How Do We Preserve New Media Works When Old Technologies Become Obsolete?

Replication Vs. Restoration: How Do We Preserve New Media Works When Old Technologies Become Obsolete?
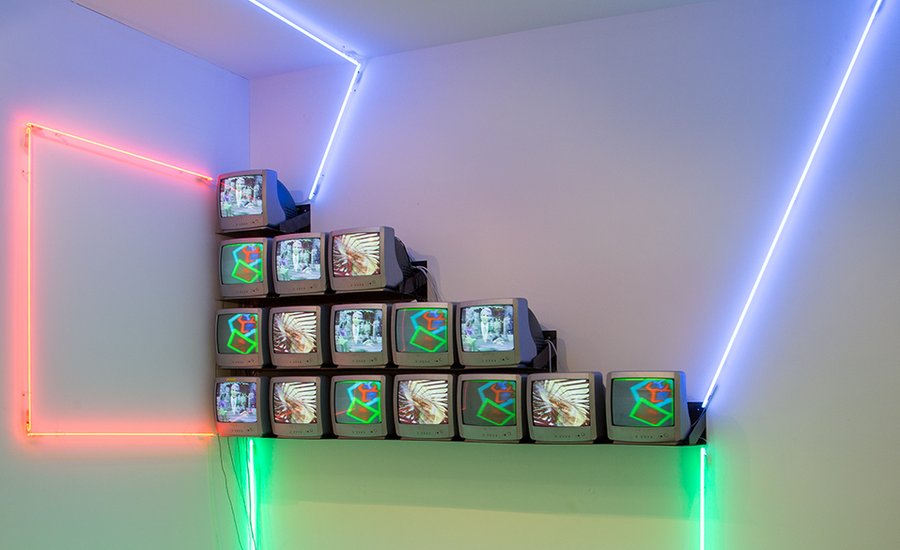
Nam June Paik, Pythagoras, 1989. Image via Fondation Dudoute.
When questioned about the extent of his legacy, Marcel Duchamp proclaimed that “art history only begins after the death of the work.” For Duchamp, to contextualize art was to kill its immediacy, and to protect it for posterity was to seal it in a tomb. One of the most exciting aspects of contemporary art is also it’s Waterloo; movements lapse from emergent to canonical in the time it takes academics to name and narrativize them, forming something of a conceptual terra incognita on the outskirts of minute-to-minute journalism. The speed with which technology is changing has accelerated madly over the last decade, so this art historical vacuum feels particularly cavernous in the context of New Media. “New Media,” a catch-all for work involving burgeoning technology that can’t quite be classified as sculpture, painting, or straightforward performance, is a forty-year old categorization at this point, and its titular implication doesn’t always reflect its content. Is a TV monitor from 1973 “New Media”? What happens when that monitor breaks and nothing exists to replace it? The taxonomical in-group of “New Media” might provide us with a framework for approaching artistic intent, but it also begs questions about rapid obsolescence and how the material conditions of technology impact the care, conceit, and exhibition of artwork.
Nine to Five, Eight to Four, Seven to Three, 2015, Josh Kline via 47 Canal
A 2016 New Yorker article by Ben Lerner called “The Custodians” dives deep into the restoration ethos of the Whitney Museum of American Art, an institution that didn’t have a conservation team in place until relatively recently when its current lead, Carol Mancusi-Ungaro, stepped in. Lerner’s piece hinges on the acquisition and display of artist Josh Kline’s 3D printed objects, which are designed to stage a coup between museological oversight and disposable prototype culture through intentional ephemerality. The author takes special note of the Whitney’s Replication Committee, a fourteen-person cohort founded in 2008 that “convenes to determine when a work of art, or a part of a work of art, cannot be fixed or restored in the traditional ways—when and how it must, instead, be replicated.” While the current guiding principle of art conservation is “reversibility,” the idea that permanent intervention doesn’t necessarily honor future iterations of the work, the conceptual problematics of that dynamic come center stage when art demands a more radical plan of attack. In the case of Kline, the questions that arose from the Restoration Cmmittee influenced the timbre of the work on display, running the gamut from “Is the kind of tape holding the LED lights significant?” to “If there’s a show in, say, China, do we need to ship these objects, or can they just be reprinted there? If they can be reprinted and not shipped, could the same work be shown in two locations at once?” When an artist like Kline takes the Duchampian route, the role of conservation starts to shift—it is a player in the scope of the artwork, imbuing meaning, context, and tension for viewers and administrators alike.
Artspace asked Whitney curator Chrissie Iles to share some of her thoughts on obsolescence in New Media, and her response was thoughtful, elucidating, and generous. “The word 'obsolete' no longer means what it did,” she began, “and it is maybe helpful to think of new ways to describe the way we approach old technologies and the shifts that have occurred and are occurring.” She spoke about the importance of the Replication Committee, which is “unique in the field,” and the necessity of collaboration in situations that require specialized consideration. “Each work in our collection presents different challenges, and we approach them as a team. In the the years-long restoration of the Nam June Paik work currently on show here in Programmed was discussed at length at the committee, and a conclusion was reached together as how to proceed. We are lucky to have our AV tech, Richard Bloes, on the team, who installed the work originally, and knew Paik well. This gives him a unique perspective, and that long experience is invaluable, and thoroughly documented, on paper and on video.”
Fin de Siecle II, 1989, Nam June Paik via Whitney.org  
When asked about the relationship between preservation and exhibition, Iles offered this; “The key to all of this is the preservation of the experiential integrity of the work. The work can be perfect technology-wise, but if the other aspects of its presentation are not paid close attention to and strictly adhered to, the work loses its power and integrity. The display of any artwork is always a process of translation—it is being shown at a different time to that of its making, and in a different place and moment in history and art history. The key is how to identify the experiential integrity of the work, which we do when we first bring it into the collection, and then to ensure that it is that experiential integrity is kept intact. How this plays out varies according to the work in question, and has to be approached on a strict case by case basis. Each work in our collection has a detailed manual showing how it should be installed; and also when the position of a doorway can and can’t be changed, what color the walls should be, how much if any light there should be in the room, the specifics of how the sound should be experienced, what the largest and smallest measurements of the projected image are, what the aspect ratio of the image should be, whether there is a carpet in the space, and images of the work installed in the past, with notes about the differences between the different iterations, and which one the artist is most happy with. The dialogue with artists about all of this in ongoing. Since most moving image works are now editioned, we are also building a network of museums and collectors who own the same work in the edition, so that we can share information and discuss together how to best take care of, and display, the work in a way that is consistent.”
In the context of more historical New Media works, a different set of issues arises. While the use of analog equipment is decided on a “case by case basis,” Iles continues, “Some see the ubiquity of strong digital light as a form of social engineering, part of a recreation of public space as a space of total surveillance—a digital panopticon, against which soft light, if not darkness, is a form of resistance. The question of opacity, identity, and disappearance is a key strand of current scholarship regarding black experience in relation to the camera, technology, and social space. We are highly aware of this in our work.”
Nam June Paik, Three Eggs, 1975-1982, via Tate Modern
Iles further provided us with an important lens through which to view the conservation of New Media; “tweaking” vs. replacement. Subtle adaptations are now the norm in restorative museological efforts, a digital extension of the “reversibility” metric lauded in more traditional pockets of of the field. She added, “It’s important to remember that all artworks in whatever medium are constantly changing, and it is a misnomer to treat objects as stable and media art as unstable. All artworks are unstable, just in different ways, with different issues.” Instead of attacking problems with genre-specific concerns, conservationists address each piece according to its own needs, reflecting an art market that is growing steadily more interdisciplinary in every imaginable facet.
Back in 2001, Howard Besser, digital preservation scholar and current director of the Moving Image Archiving and the Preservations Masters degree program at NYU Tisch School of the Arts, submitted “Longevity of Electronic Art” to the International Cultural Heritage Informatics meeting at UCLA. While much of the paper tracks outdated technology in highly specialized terms, Besser included some moments of poetic respite in the text, using existential quandaries to buoy his strategic troubleshooting procedures. “The most critical element to saving a work of electronic art is first determining what that work really is, how far it extends, what its boundaries are, under what technical environments it should be shown etc. This is an activity that must be undertaken jointly between a curator and conservator, and is likely to involve the artist as well,” he states, continuing, “Though traditional forms of theater and music have well-developed approaches to finding a canonical form that forms the basis of most instanciations (performances) of that work, more contemporary art forms have not yet explored how they can create a canonical form. With many contemporary works, canonical forms can be more effectively sought for groups of works sharing common approaches (rather than by general form or genre). For example, the canonical form of groups of works by John Cage, Sol LeWitt, and Dan Flavin may be a set of formulas and instructions for each work, and each performance, piece or installation might be a variant form of a given work. As we being to understand more about contemporary forms of electronic art, the application of semiological analysis to groups of works may lead to the development of ways of expressing canonical forms for subgenres of electronic art.”
 Friederike Pezold, Die neue leibhaftige Zeichensprache, 1973-76, via SculptureCenter.org
When we consider "canonical forms" for the preservation of art that shirks, challenges, or antagonizes the notion of "canon" by virtue of its material embodiment, siloed agendas or pre-conceived operations start to fall away in service of a more tailored, wholisitic approach. Art conservation departments are borrowing from the both scientific and intellectual outlooks of their analog predeccesors to create the most authentic viewing experience possible for visitors. "Authenticity," even as it applies to synthetic, projected, or appropriated content, is not just a function of artist objectives or institutional fabrication; it requires an un-interrupted experience of the work free from the distractions that stem from decay or overcompensation. By striking a middle ground between fetishizing destruction and erasing authorship, the sort of authorship that is more relevant than ever in the altermodern digital landscape, conservationists of New Media are applying the kind of forward-thinking, practical imagination such cutting-edge fare requires. 
Artspace Logo
 RELATED ARTICLES: 

children's books about art


7 Great Children’s Books About Art That Just May Inspire the Next Generation of Wee Warhols

Here's your chance to help cultivate the creativity of the next generation.
A Matisse in the making. Photo courtesy of Negative Space.
“All children are artists,” Picasso famously said. “The problem is how to stay an artist when the child grows up.”
It’s true: kids don’t need much encouragement when it comes to making art. Put a brush in their hand and some (ideally non-toxic) paint in their vicinity, and most children will go to town covering any surface in front of them.
But it’s all too easy for kids to give up on their own artistic abilities with age. That’s why showing them models of other artists’ who have cultivated a lifelong relationship with creativity might inspire them to do the same, and to see art making as an exciting and essential aspect of life. So, to inspire the little ones in your life, we’ve rounded up our favorite artist books for kids.

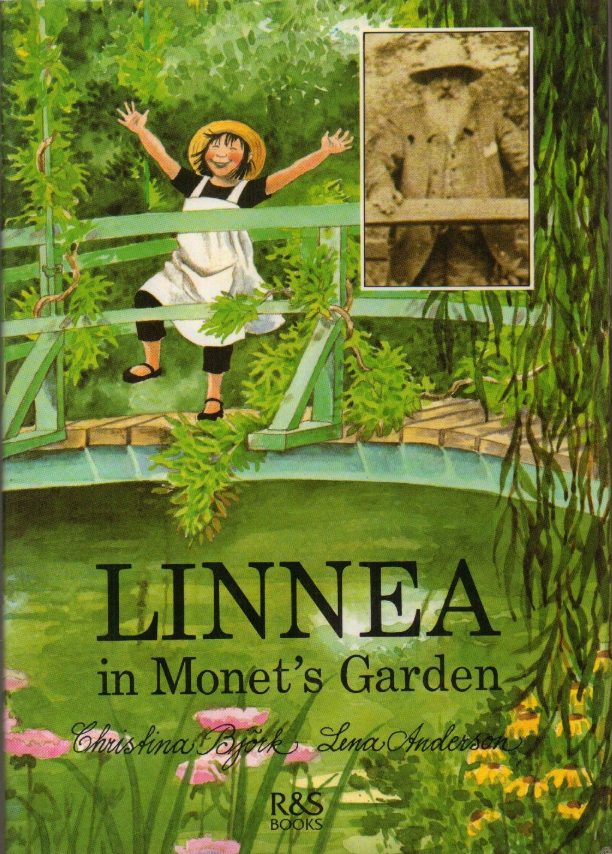
Linnea in Monet’s Garden

Age Range: 6 and up
Starting with a personal favorite: I was obsessed with this book as a kid. It’s the story of a little girl named Linnea who befriends a kindly neighbor named Mr. Bloom, who teaches her all about the painter Claude Monet and the “blobby” style of painting called  Impressionism. The story culminates in the two of them taking a trip to Paris, where they end up visiting not just Monet’s house and gardens in Giverny, but the Orangerie and the MusĂ©e d’Orsay, too.
It’s all very charming and features a good deal of art-historical nerding out. It also had the effect of instilling in me an intense fascination with painting, France, and travel in general—a positive outcome, in my estimation.

Grandpa and the Library: How Charles White Learned to Paint

Age Range: 6 and up
When I was little, I liked stories about the logistics of how people did things or got good at things. This lovingly illustrated book does just that, through the story of how a young Charles White taught himself how to draw and observe the world through picture books in the Chicago Public Library, and went on to become a singular artistic voice of the 20th century.
Published in conjunction with the Charles White retrospective at New York’s Museum of Modern Art in 2018, this 40-page volume offers a wonderful introduction to the making of a great painter, and includes an appendix of additional biographical information and suggested reading for adults, too.

Action Jackson

Age Range: 6–10 years
Jackson Pollock might not be the most obvious choice for a children’s book protagonist—what with his drinking problem and untimely end—but this punchy book succeeds in making him an age-appropriate and compelling subject. It does so by narrowing its focus to a singular period in the artist’s life: when he painted his magnum opus, Lavender Mist.
“Some of this account is imagined,” the foreword cautions. “We don’t know if the sequence of events during months of May and June 1950 was exactly as we have described it.” But the authors assure us they based their narrative on first-hand accounts, and the resulting story is vivid and full of great little details. I also love the wiry, frenetic line work of the accompanying illustrations to capture Pollock’s macho energy.

Yayoi Kusama: From Here to Infinity

Age Range: 4–8 years
Yayoi Kusama‘s pumpkins and polka dots sometimes feel like the stuff of imaginative childhood dreams—an idea the authors have lovingly taken advantage of here. High-contrast illustrations by Ellen Weinstein capture the playful side of Kusama’s art, while the story, expertly written by Sarah Suzuki, a MoMA curator of drawings and prints, tells a kid-friendly version of the artist’s life. Though the book chooses to largely side-step some of the more challenging elements of Kusama’s biography, it still manages to bring her art to life in a way that’s accessible, engaging, and inspiring.

Frida Kahlo and Her Animalitos

Age Range: 4–8 years
Take a zoological journey into the world of Frida Kahlo, where the artist’s pets take center stage. Frida Kahlo and Her Animalitos explores the personal and symbolic relationships of animals in Kahlo’s life and art, drawing from both her biography and the content of her narrative paintings. If your child is obsessed with the creatures of the natural world, then this book is likely to be a hit.
The best part of it all is the book’s art, for which illustrator John Para painted on rough wood panels for an especially warm and textural feel. Note that there’s also a Spanish-language version, too!

Henri’s Scissors

Age Range: 3 and up
Written for very young children, Henri Matisse appears as an almost wizardly figure in this book, discovering a magic wand in the form of a pair of humble scissors that allowed him to transform colored paper into some of his greatest masterpieces. It gets a little woo-woo at the end—Matisse dies and ascending to heaven on a cavalry of his colorful shapes—but it’s a sweet introduction to one of the 20th century’s modernist giants.

Pop Art Baby!

Age Range: 0+
For the most youthful art fans in your life, look no further than the enthusiastically titled Pop Art Baby! This sturdy board book is made of cardboard with rounded edges—perfect for the tactile, chewing-on-things studio practice of many artist babies—and introduces universal themes of love and family in multiple languages and through the form of iconic Keith Haring drawings.
Arty parents will enjoy the Pop Art pedigree, babies will enjoy the bright pages. Win-win.

All our recommendations are independently chosen by members of the artnet News team. If you make a purchase through links in this article, artnet News will earn an affiliate commission that helps fund the art-world journalism you rely on.

Follow artnet News on Facebook: 
 
Want to stay ahead of the art world? Subscribe to our newsletter to get the breaking news, eye-opening interviews, and incisive critical takes that drive the conversation forward.
SHARE